Measuring Mast for Custom Mast AdaptorUpdated 3 months ago
As of Friday the 26th of April 2024, Foil Drive kits now come with a Universal Mast Adaptor. Continue reading below if the Universal Mast Adaptor does not work with your mast, and you need a custom adaptor.
If your mast adaptor is not listed on the website or in the mast compatibility chart, follow the instructions below on how to accurately measure your mast to create a custom adaptor.
WHAT TO DO IF YOUR MAST ADAPTOR IS NOT LISTED
In the first instance, check out this article to learn how to choose the correct mast adaptor.
Secondly, email [email protected] to ensure we aren't already working on an adaptor to suit your mast.
Note: If the mast is old and no longer in production, we are still able to help!
CREATING A CUSTOM MAST ADAPTOR
From here we'll need your help to assist us in creating an accurate profile.
What you will need
a) Your mast
b) A piece of paper
c) Your phone or camera
Option 1 - Trace Profile Tool - You can find these at hardware stores. The pins need to be fine (individual pins below 1mm are perfect)
Option 2 - An extremely sharp pencil - We recommend a Mechanical Pencil
Instructions
1. Please copy & paste the below information into your email with answers when providing your trace:
Mast name:
Weblink to the mast (Allows us to correctly name the pod):
Date of original enquiry:
If you've spoken with someone already, please name:
Mast chord:
Mast thickness:
BEFORE YOU START
Trace Profile Tool - Suitable for Carbon Masts
2. Grab your Trace Profile Tool and press it on a flat surface so that the pins are all level and evenly spread on both sides.
3. Keeping the tool level, slowly press down on your mast and stop as close to the centre line of the mast as possible. This is easiest to watch one side at a time as per Paul's video.
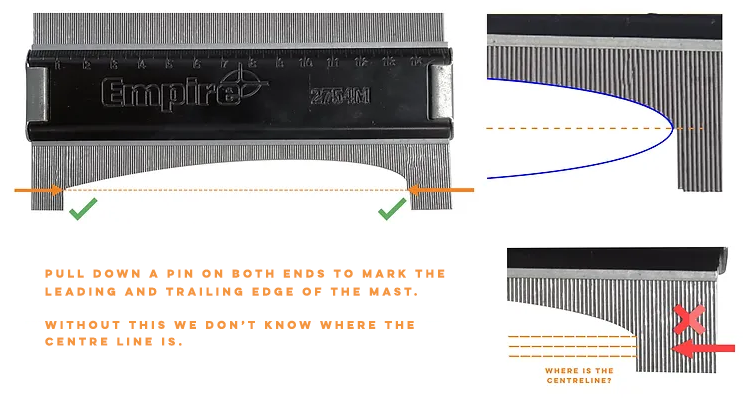
Note: Image two below indicates how you need to pull down a pin to mark the exact centre line of the mast. Without this, we do not know where your trace starts and finishes.
4. Once happy with the trace, pull down any excess pins so that we can determine where your trace starts and ends. This is super important to define - See picture 4!
5. Measure the chord and length of your trace including at least one decimal and write beside your trace drawing.
6. Place the Tracing tool on a white piece of paper, on the ground and stand directly over it. You need your camera/phone to be directly above the Tracing Tool and above 1.5m (4.9 feet) above it. Use as much zoom as you can to get the highest resolution picture as possible.
7. Ensuring there is adequate lighting, take the picture and send it as a High-Quality Image as a response to the existing [email protected] thread you created - Including the answers to the dot points at the start of this blog.

Related Articles - Click to read:
Choosing Correct Custom Mast Adaptor
Mounting Custom Foil Drive Mast Adaptors
Compare Motor Mounting: Universal vs Integrated Masts
To learn more, check out the other articles on our Help Centre which can be found under the 'Support' tab on the website.
As always, if you have any questions, please reach out to us at [email protected].
Happy Foil Driving!