
Removing a Rotor Seized to the StatorUpdated 13 days ago
If your rotor is difficult to remove by hand or has become seized onto the stator, this guide explains how to safely separate the motor while minimising the risk of damaging the bearings, shaft or other internal components.
Important: Do not use excessive force, pry between the rotor and stator, or strike the rotor directly. The Motor Separation Jig is strongly recommended as it keeps the punch correctly aligned with the motor shaft and significantly reduces the risk of bearing or component damage.
For instructional video, see: Seized Rotor Removal
Before You Begin
You will need:
- 2.5 mm hex driver
- Penetrating lubricant such as WD-40, INOX or similar
- Motor Separation Jig, including:
- Alloy mounting plate
- Mounting screws
- 10 mm stainless steel punch
- Hammer
- Bench vice or solid wooden workbench
Motor Separation Jig
The Motor Separation Jig is highly recommended for removing a seized rotor. The precision-machined guide hole keeps the punch centred on the motor shaft, helping prevent the punch from contacting or damaging the ceramic bearings.
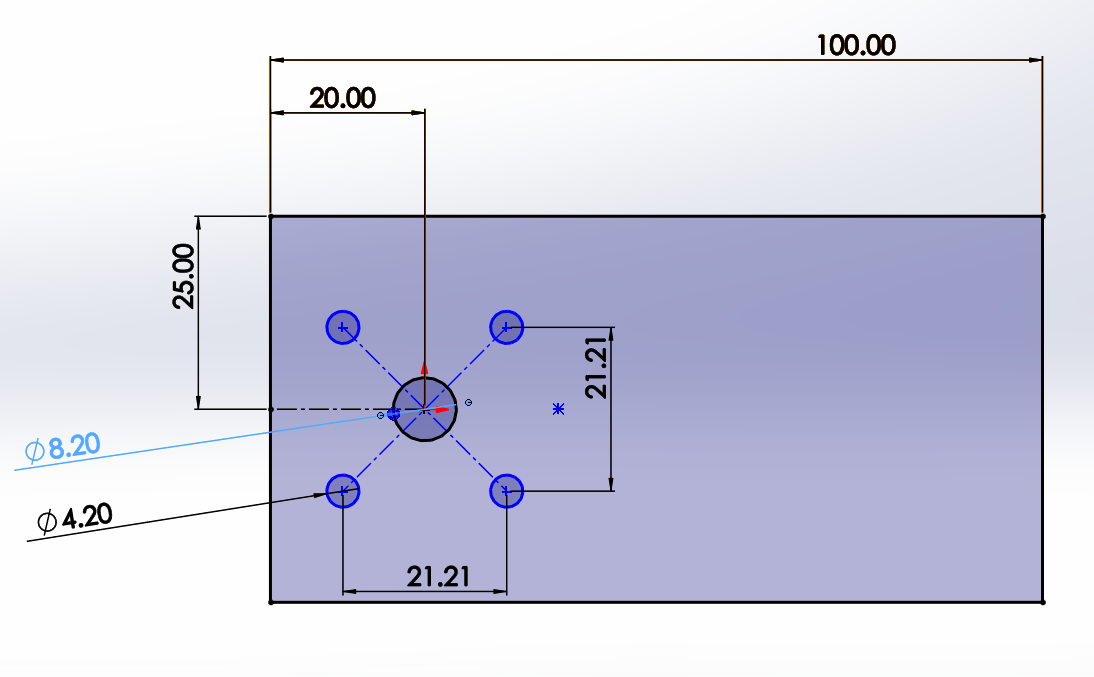
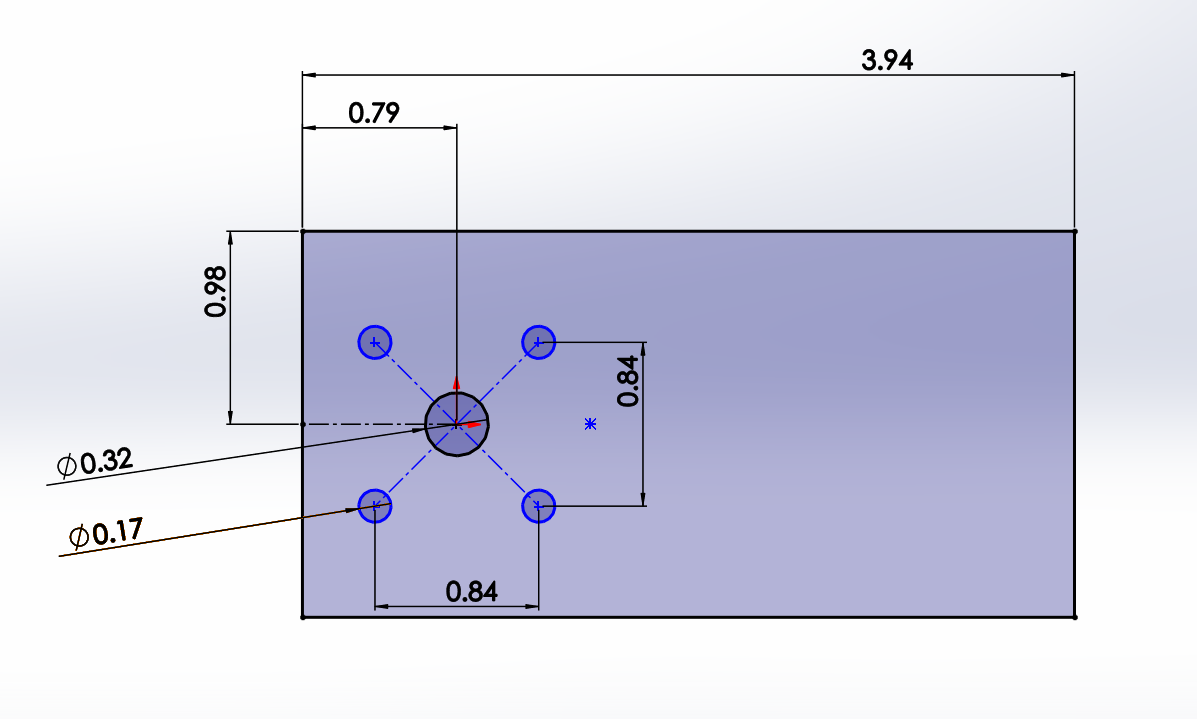
If you would like to have a jig manufactured locally, the required dimensions and CAD files are provided below.
See the below pics for measurements and the DXF file if you would like a local machining shop to produce a plate for you.
Measurements in millimetres:
Measurements In inches:
CAD files:
- Motor Holder 8 mm Pin – STEP
- Motor Holder 8 mm Pin – DXF
- Motor Holder 8 mm Pin – DWG
Note: Ensure the jig and punch are correctly sized and securely mounted before applying any force to the motor.
Removing the Rotor
Step 1 – Apply Lubricant
If the rotor is seized or difficult to remove:
- Apply a small amount of penetrating lubricant to the exposed motor shaft where it enters the stator.
- Allow the lubricant to soak for several minutes.
- Try gently rotating and pulling the rotor by hand.
If the rotor does not release easily, do not force it. Continue with the Motor Separation Jig.
Step 2 – Secure the Motor
- Remove the motor from the mast if required.
- Secure the motor to the Motor Separation Jig using the supplied mounting screws.
- Secure the jig firmly in either:
- A bench vice, or
- A solid wooden workbench.
Make sure the motor cannot move while force is being applied.
Important: The motor must be firmly secured before using the punch and hammer.
Step 3 – Insert the Punch
- Insert the 10 mm stainless steel punch through the precision-machined guide hole in the jig.
- Ensure the punch is centred directly over the motor shaft.
The jig is designed to keep the punch aligned with the shaft as the rotor is separated from the stator.
Important: Do not allow the punch to contact the ceramic bearings or other internal components.
Step 4 – Separate the Rotor
- Hold the rotor securely with your free hand where possible.
- Using a hammer, apply firm, controlled taps to the punch.
- Continue gradually rather than using a single heavy strike.
- As the shaft begins to move through the stator, maintain control of the rotor.
- Once the shaft has moved sufficiently, the rotor will separate from the stator.
If the rotor does not move after controlled tapping, stop and reassess rather than increasing the force. Excessive force can damage the motor shaft, bearings or internal components.
If the rotor remains firmly seized, contact Foil Drive Support or an authorised repair centre for assistance.
Inspect the Motor
Once the rotor has been removed:
- Inspect the motor shaft for corrosion, damage or scoring.
- Check the ceramic bearings for damage or contamination.
- Inspect the rotor and stator for corrosion or debris.
- Check that the rotor can move freely before reassembly.
- Clean and maintain the motor as required.
If you find significant corrosion, pitting, damaged bearings, a damaged shaft or other internal damage, do not reassemble or operate the motor until it has been assessed.
See links below for repair instructions:
Motor Bearing Replacement & Retention
Reinstalling the Rotor
The rotor contains strong magnets and can be pulled rapidly toward the stator during reassembly.
- Hold the rotor securely with both hands.
- Carefully align the rotor with the stator.
- Slowly lower the rotor into position.
- As the magnets begin to attract the rotor to the stator, maintain control with both hands.
- Allow the rotor to seat gradually and squarely onto the stator.
- Confirm the rotor rotates smoothly before reinstalling the propeller and hub.
Warning: Keep fingers clear of the gap between the rotor and stator while the magnets are attracting. The rotor can move suddenly and may cause a pinch injury.