
Motor Bearing Replacement & RetentionUpdated 11 days ago
If a ceramic bearing in your Foil Drive motor is damaged, loose, or requires replacement, this guide will walk you through how to remove, replace and secure the bearings correctly. This guide is the latest recommendation on bearing retention.
Note: For customers who have an Assist, Assist PLUS or V1 Stator, you can apply an additional compound called Loctite 620 around the outer race of the bearing, before seating into the stator. See last video link below for visual instructions. This step is not required on V2 stators.
Purchase a Motor Servicing Kit
Watch the instructional video here: Removing Bearings with the Motor Separation Jig
Watch the instructional video here: Securing Bearings in Foil Drive Motor
Watch the instructional video here: Securing Bearings in V1 and Assist PLUS Stators
Motor Bearing Locations
Your Foil Drive motor contains three bearings. The locations are numbered 1, 2 and 3 in the motor diagram above.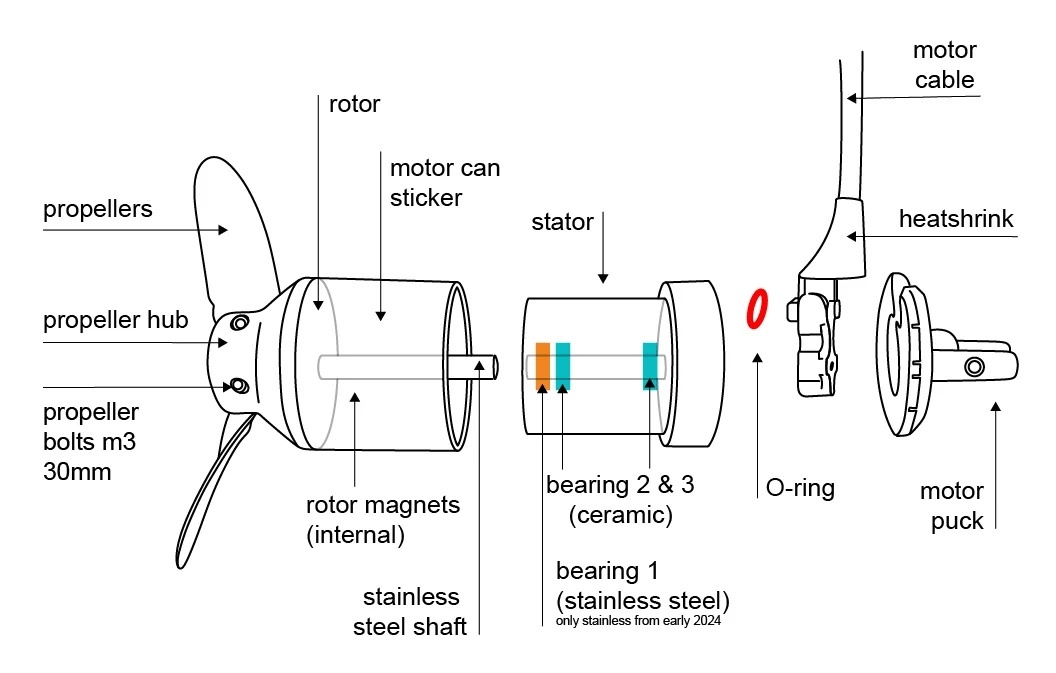
Important: For all Gen2 & Gen2.5 systems, the stainless-steel bearing must be installed in Position 1 — the outermost bearing.
Using a ceramic bearing in Position 1 can result in premature bearing failure and potentially cause significant damage to the motor.
Note: The instructional video below is from an earlier bearing procedure. Always follow the bearing type and position information in this article.
Before You Begin
You will need
- Flat-blade screwdriver
- Clean, dry cloths
- Replacement Foil Drive ceramic and/or stainless-steel bearing(s)
- Bearing press tool, included with the bearing purchase
- Loctite® 480
You may also need
- Small hammer
Safety Information
Damaged ceramic bearings can produce very sharp fragments.
If you are removing a damaged ceramic bearing, always wear:
- Safety glasses
- Protective gloves
If the ceramic bearing housing is difficult to remove, carefully use a flat-blade screwdriver and light hammer taps to crack the ceramic housing and release the bearing.
Take care not to damage the motor components or stator when removing the bearing.
Removing a Bearing
- Remove the motor rotor from the stator.
- Identify the bearing that requires replacement.
- Carefully remove the damaged or loose bearing.
- If a ceramic bearing has broken, ensure all ceramic fragments are removed from the motor.
- Clean the bearing seat and surrounding area with a clean, dry cloth.
- Inspect the bearing seat and stator for any signs of damage before installing the replacement bearing.
If the stator or bearing seat is damaged, stop the installation and contact Foil Drive Support.
Installing a Replacement Bearing
- Confirm that you have the correct bearing for the required position.
- For Gen2 systems, ensure the stainless-steel bearing is installed in Position 1 — the outermost bearing.
- Carefully position the new bearing into the bearing seat.
- Use the supplied bearing press tool to press the bearing fully and evenly into position.
- Confirm that the bearing is seated correctly before applying adhesive.
Securing Loose or New Bearings
If a bearing is still in good condition but has become loose in the stator, it can be secured using Loctite 480.
Loctite 480 helps retain the outer bearing housing in the stator and is particularly useful for bearings that have become slightly loose over time.
Applying Loctite 480
- Ensure the bearing and surrounding area are clean and dry.
- Apply a small amount of Loctite 480 around the outside of the bearing housing, where it contacts the stator.
- Carefully work the adhesive around the outer circumference of the bearing.
- Avoid applying excessive adhesive.
IMPORTANT: Do not allow Loctite 480 to enter the centre of the bearing or contact the bearing's moving surfaces.
If adhesive enters the centre of the bearing, it can cause the bearing to seize and may result in damage when the motor is operated.
The video demonstrates the correct application of Loctite 480 to the outside of the bearing housing.
Important: The video is from an earlier procedure. For all Gen2 systems, the stainless-steel bearing must be installed in Position 1 (outermost bearing).
Allow the Adhesive to Cure
After applying Loctite 480, allow the adhesive to cure for a minimum of 24 hours before operating the motor.
Do not operate the motor before the adhesive has fully cured.
Reinstalling the Rotor
When reinstalling the rotor onto the stator, take care to prevent the rotor from snapping into position.
Always:
- Hold the rotor securely with both hands.
- Slowly guide the rotor onto the stator.
- As the magnets begin to engage, continue guiding the rotor down under control.
- Do not allow the rotor to snap onto the stator.
Allowing the rotor to snap into place can put excessive force on the bearings and may cause them to move or become damaged.
Checking Your Bearings
You can check whether a bearing requires replacement by inspecting the inner race for movement.
To test the bearing:
- Insert your little finger or a pen into the centre of the bearing.
- Gently lift upwards.
- Check for movement of the inner race.
If the inner race has noticeable movement, the bearing should be replaced.
Common Questions
How can I prevent the bearings from popping out?
When reinstalling the rotor, always use both hands to slowly guide it onto the stator.
As the magnets begin to engage, prevent the rotor from snapping into position. A sudden magnetic engagement can put excessive force on the bearings and cause them to move or become damaged.
How do I know if my bearings need replacing?
Check the inner race of the bearing for movement. Insert your little finger or a pen into the centre of the bearing and gently lift upwards.
If the inner race has noticeable movement, the bearing should be replaced.
Can I use Loctite 480 inside the bearing?
No.
Loctite 480 should only be applied around the outside of the bearing housing, where it contacts the stator.
Do not allow adhesive to enter the centre of the bearing or contact the moving surfaces. This can cause the bearing to seize and may damage the motor.
How long should I wait before using my motor?
Allow a minimum of 24 hours for Loctite 480 to fully cure before operating the motor.
Can Foil Drive replace my motor bearings for me?
Yes. Foil Drive has service centres in Adelaide, Australia and Florida, USA that can carry out motor servicing and bearing replacement.
If you would like to send your equipment to a Foil Drive service centre, please contact [email protected] to arrange the repair or maintenance.