Universal Mini Pod Installation and User GuideUpdated 13 days ago
The Universal Mini Pod is a toolless, instant-latching, universal motor pod designed to reduce drag, improve ride feel, and make mast swaps fast and screw-free.
It redefines universal mounting through a smaller surface area, improved hydrodynamics, and simplified usability while maintaining full compatibility across setups.
The Foil Drive Mini Pod is designed as a universal adapter to suit hundreds of different mast profiles. As mast designs have evolved, the industry has increasingly moved towards thinner trailing edges, including carbon and other slim-profile masts. While the Mini Pod has been optimised for these newer profiles, it is still compatible with older, thicker aluminium masts.
Compatibility & Installation
Motor Compatibility
The Mini Pod is only compatible with V2 motors (removable cable) - Both Standard and High Power. V1 Motors that have a fixed cable cannot be used with this pod system.
Strap Sizing & Mast Compatibility
Strap sizing is based on the mast chord width (width across the mast profile). The correct strap should be selected to ensure secure fitment.
- Small: 95–110 mm
- Medium: 112–128 mm (Fitted to pod from factory)
- Large: 130–145 mm
Most masts on the market use the Medium strap size.
Installation Guide
Step 1 – Apply Grease Around Motor Plug and Check Cable O-ring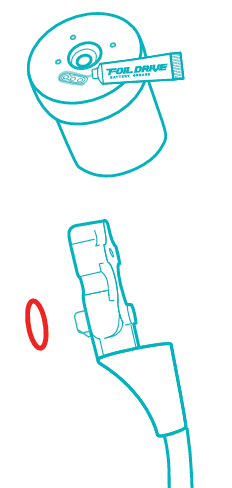
Before attaching the Inner Pod to the stator, apply a small bead of Foil Drive Dielectric Grease around the outside of the plug on the stator and check the red O-ring is installed on the cable plug. 
Important:
- Apply grease in the cavity around the motor plug only.
- Do NOT apply grease directly to the connector pins.
The grease works together with the cables red O-ring to create a watertight seal when connected.
Step 2 – Attach the Inner Pod to the Stator
- Position the Inner Pod onto the stator.
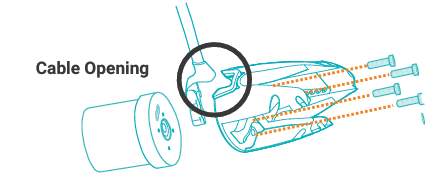
- Ensure the cable cut-out aligns with the motor cable connection area.
- Install the four M4 x 16mm screws.
- Tighten the screws evenly in a cross pattern.
Check Before Continuing
Inspect the join between the stator and Inner Pod.
- The surfaces should sit perfectly flat.
- There should be no visible gaps.
If a gap is present, remove the pod and reinstall it before proceeding.
Step 3 – Select the Correct Strap
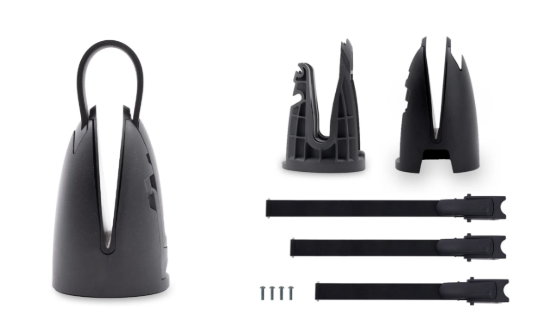
Three strap lengths are included:
Medium Strap (Recommended)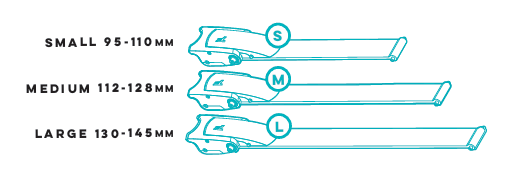
Used for most mast installations.
Long Strap
Best suited for:
- Wide chord masts
- Larger carbon masts
- Installations positioned lower on the mast
Short Strap
Best suited for:
- Thin masts
- Installations positioned higher on the mast (for tapered masts)
Tip: Finding the correct strap and ladder position may require some trial and error.
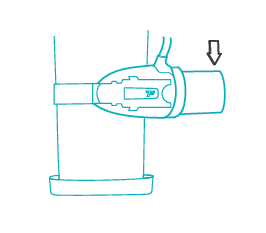
Step 4 – Install the Outer Pod to Mast
Ensure the Inner Pod and Outer Pod are separated for this step. 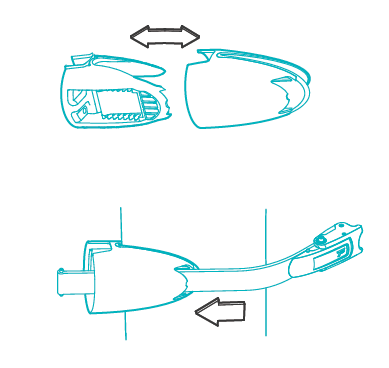
- Insert your chosen strap into the Outer Pod.
- Ensure the latch faces upward.
- Position the Outer Pod on the mast.
- Push it fully forward until the rubber sleeve sits flush against the trailing edge of the mast.
Important
- Always install the Outer Pod onto the mast first.
- The rubber sleeve needs to conform to the mast shape before the rigid Inner Pod is installed.
Attempting to assemble the pod first and then force it onto the mast can result in:
- Poor fitment
- Large gaps
- Excessive installation force
- Reduced performance
Step 5 – Insert the Inner Pod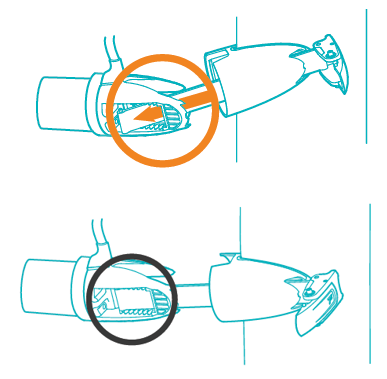
Once the Outer Pod is correctly seated:
- Feed the strap through the inside of the Inner Pod, ensuring the adjustment pin is on the outside of the ladder.
- Secure the pin on the strap into one of the slots on the ladder.
- Push the Inner Pod into the Outer Pod until they sit flush together.
The rigid Inner Pod creates the structural strength of the assembly and locks the Outer Pod into shape.
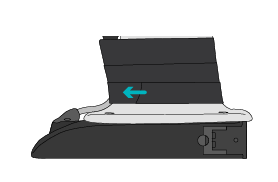
Note: You may notice a slight amount of flex or deformation in the Mini Pod's outer shell during installation. This is completely normal and is an intentional part of the design.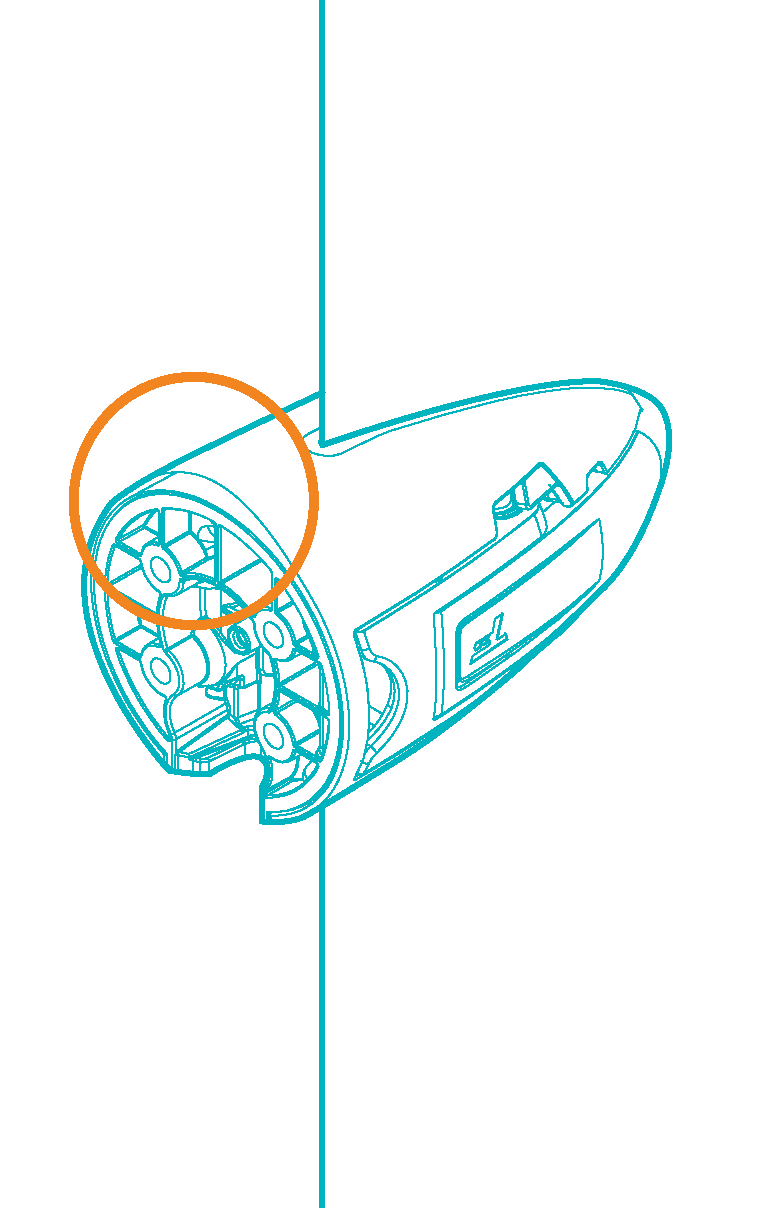
The image on the right is an example of acceptable warping.
The Mini Pod features a rigid internal core that securely attaches to the motor and contains the latching mechanism, while the outer shell is designed to flex and conform to a wide variety of mast shapes and dimensions. This flexibility allows a single Mini Pod design to achieve a secure fit across hundreds of different mast profiles.
A small amount of warping or deformation on the outer shell during installation is expected and indicates the outer shell is functioning as intended. If the entire assembly were completely rigid, it would not be able to accommodate the wide range of mast geometries found across the industry.
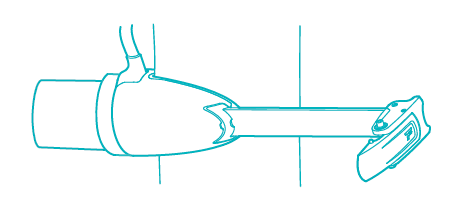
Step 6 – Set Strap Tension
- Feed the strap pin through the latch opening.
- Rotate the strap so the pin aligns with the locating pin slot.
- Close latch so it is flush with the pod. This action should be firm but not require excessive force.
Correct Tension
Note: Watch video below for visual explanation (Timestamp: 6:00)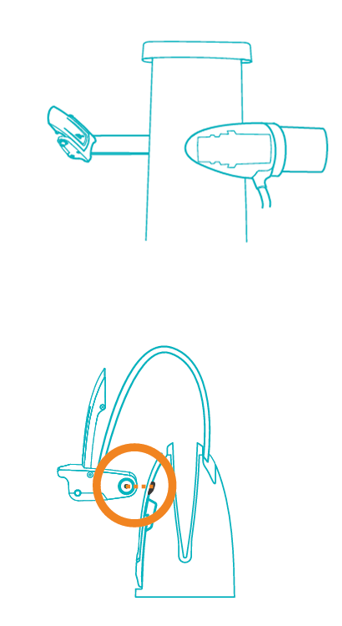
The large locating pin should:
- Pivot into position with slight resistance.
- Stay in place when inserted.
- Require a firm snap to close the latch.
When closed, the pod should feel secure and rigid on the mast.
How to Tell if the Strap is Too Loose
Signs of insufficient tension:
- Latch closes very easily.
- Little or no spring force when opening.
- Pod feels less secure on the mast.
If this occurs:
Move the strap to a tighter ladder position.
How to Tell if the Strap is Too Tight
Signs of excessive tension:
- Significant force required to close the latch.
 Strap or latch begins to deform.
- Latch springs open aggressively when released.
Over-tightening can:
- Stretch the strap prematurely.
- Reduce strap life.
- Make installation difficult.
Aim for a firm, secure fit without excessive force.
Step 7. Install Cable Guide and Tape Cable
For best performance, always install the supplied rubber mast cable guide and secure the cable with electrical tape following the instructions in your Foil Drive User Manual.
Installation tips
- Use the supplied mast cable guide - it'll keep your cable straight along the trailing edge of the mast and make taping easier
- Tape the whole cable from the base of the motor right down to the mast plate
- Avoid bumps, bulges and bubbles in the tape - for best hydrodynamics, you want a smooth finish
- Finish with the tape facing the rear of the mast (direction of water flow) to avoid peeling when in use
Installation Checklist
Before Riding:
- Grease applied in cavity around motor plug on stator
- O-Ring installed on cable plug
- Inner Pod mounted flush to stator
- Correct strap selected
- Outer Pod installed onto mast first
- No gaps between pod and mast
- Strap tension correctly adjusted
- Cable guide installed
- Cable secured
- Pod feels rigid and secure
Important: After your first session, the strap may need adjusting as the pod will have now seated in place. Check and adjust if needed.
Watch the video below for a visual installation instructions
Storage Recommendations
For long term storage:
- Release the strap tension.
- Store the system without compression on the strap.
This helps extend strap life and reduces permanent stretching.
Note: Some strap stretch over time is normal.
If this occurs, simply move to the next ladder position to restore proper tension.
Cleaning & Maintenance
Regular maintenance is simple but important.
After Cleaning Your Foil Drive
- Wash all components with fresh water.
- Remove any sand, salt, or debris
If you're not foiling again for awhile
- Release strap tension
- Remove outer shell and rinse thoroughly
Pay particular attention to:
- Strap slots
- Latch mechanism
- Outer Pod
- Rubber Sleeve
Rubber Sleeve Inspection
The rubber sleeve can be removed for cleaning.
When reinstalling:
- Ensure it is fully seated.
- Ensure all locating features align correctly.
- Do not fold or roll the sleeve edges.
An incorrectly installed sleeve may prevent proper clamping.
Replacing a Damaged Strap or Latch
If a strap or latch becomes damaged:
- Use a 2.5mm Allen key to push out the retaining pin.
- Remove the damaged component.
- Transfer the pin to another strap assembly from the kit.
- Reinstall the pin so it sits flush.
Because multiple straps are included, you effectively have spare latch assemblies available in the kit.