
How to Install the V2 Propeller GuardUpdated a month ago
The V2 Propeller Guard provides additional bump protection around the propeller. Correct installation of the red O-ring is critical to maintaining the waterproof seal of the motor.
Follow the steps below carefully before heading out on the water.
Before You Begin
You will need:
- V2 Propeller Guard
- Your V2 motor (Removable Cable)
- Existing motor mounting bolts supplied with your specific mounting system
- Red O-ring from the motor plug connection
- Foil Drive Hex Driver
Installation
1. Remove the Red O-Ring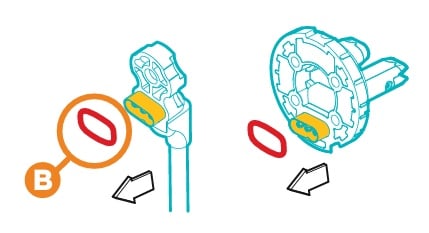
Locate the red O-ring fitted to the yellow plug on the Puck or Motor Cable.
Carefully remove the O-ring from the plug.
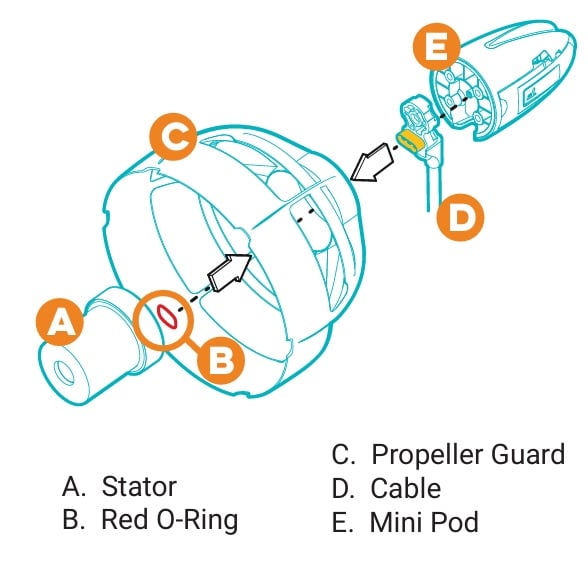
2. Fit the O-Ring Inside the Propeller Guard
Place the red O-ring on the inside of the Propeller Guard before connecting the motor.
Important: The O-ring must be positioned inside the Propeller Guard to maintain waterproofing of the motor.
3. Position the Propeller Guard
Position the Propeller Guard between the stator and the motor cable/Puck connection.
4. Connect the Stator
Align the stator plug and bolt holes, then push the components together.
Check that the Propeller Guard and O-ring remain correctly positioned as the motor is connected.
5. Secure the Stator
Fasten the stator to your mounting system as outlined in your Foil Drive system or mounting-system instructions.
Use the existing bolts supplied with your specific mounting system.
Before Riding
Check that:
- The motor is securely mounted
- The Propeller Guard is correctly seated
- The red O-ring is correctly positioned inside the guard
- All mounting bolts are secure
Riding With the Propeller Guard
The Propeller Guard will create additional drag when it re-enters the water.
If you ride with your motor positioned approximately 15–25 cm above the water, we recommend initially testing the guard in calm water at a slow speed. This will allow you to become familiar with how the additional drag feels before riding at higher speeds or in more challenging conditions.