
Throttle Spring ReplacementUpdated a month ago
This guide explains how to replace the throttle return spring in your V3 Controller.
A damaged or worn spring can affect the triggers' ability to return to its neutral position. Replacing the spring is a simple process that takes only a few minutes.
Foor instruction Video, see: Throttle Spring Replacement on V3 Controller
What You Will Need
- Replacement V3 Controller throttle spring
- Phillips head screwdriver
Step 1 – Remove the Controller Side Panel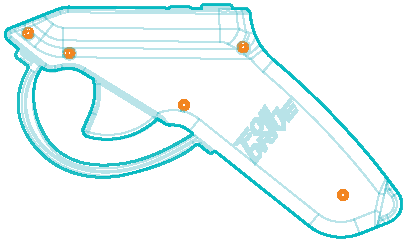
- Using a Phillips head screwdriver, remove the five (5) screws securing the controller side panel.
- Carefully lift the side panel straight up and off the controller body.
Step 2 – Remove the Trigger and Spring
- Gently pull the trigger upward.
- Lift the trigger off the pivot arm.
- Remove any debris, dirt, or damaged spring fragments before installing the new spring.
The trigger should lift free without excessive force.
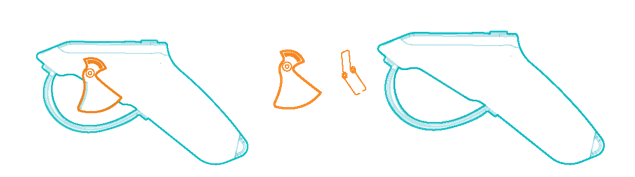
Important: Ensure the trigger area is completely clean before reassembly to ensure smooth throttle operation.
Step 3 – Position the New Spring
- Place the new spring into the trigger.
- Ensure the spring orientation matches the installation graphic below
- Align the spring holes with the corresponding holes in the trigger.
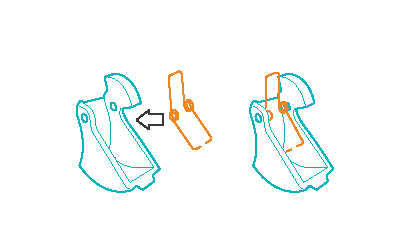
Check Before Continuing
- Spring seated correctly
- No debris inside the trigger assembly
- Spring orientation matches the diagram
Step 4 – Reinstall the Trigger
- Slide the trigger back onto the pivot arm.
- Ensure the metal spring is pressing against the plastic partition inside the controller.
- Confirm the trigger's 'stop tab' is located inside the controller housing as shown in the installation graphic.
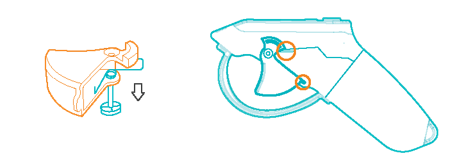
Important: Incorrect spring or stop tab positioning may prevent the trigger from returning correctly.
Step 5 – Reassemble the Controller
- Ensure all wires and antenna are tucked inside the controller cavity to prevent them from being pinched
- Place the controller panel back onto the controller body.
- Ensure the panel sits flush before tightening the screws.
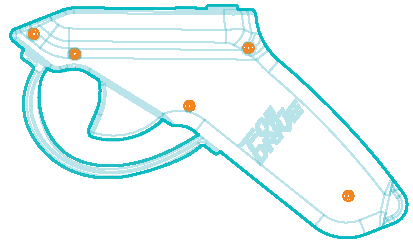
- Reinstall the five (5) Phillips head screws.
- Tighten the screws evenly.
Do not overtighten the screws.
Step 6 – Recalibrate Throttle
After replacing the spring, the throttle should be recalibrated to ensure accurate operation.
- Power on the V3 Controller.
- Press the Plus (+) and Minus (–) buttons to enter the menu.
- Select Option 2 – Calibration.
- Follow the on-screen prompts to complete the calibration.
- Confirm the throttle reaches its full range of movement and returns correctly to neutral.
For detailed calibration instructions, see the Controller User Manual here
Important: Do not use the Foil Drive system until the throttle has been successfully calibrated and the trigger has been confirmed to return fully to neutral.
Final Inspection
Before use:
- Confirm the trigger moves freely through its full range of motion.
- Confirm the trigger returns smoothly to its neutral position.
- Verify all five screws are installed and secure.
- Ensure the controller housing is fully closed with no visible gaps.
Your V3 Controller is now ready for use.
Troubleshooting
Trigger Does Not Return to Neutral
- Check the spring orientation.
- Verify the spring is pressing against the plastic partition.
- Confirm the stop tab is correctly positioned inside the controller.
Trigger Feels Rough or Sticks
- Remove the trigger and inspect for debris.
- Ensure the spring is correctly seated in the trigger.
- Check that no components are pinched during reassembly.