
Motor Cutting Out, Stuttering or Spinning IntermittentlyUpdated a month ago
If your motor cuts out, stutters, spins intermittently, or does not engage when you apply throttle, follow the troubleshooting steps below.
These checks resolve the vast majority of motor connection issues without requiring parts to be replaced.
Symptoms
This guide applies if your motor:
- Starts and stops unexpectedly
- Grinds or does not run smoothly
- Stutters or pulses while riding
- Spins intermittently
- Does not engage every time throttle is applied
Inspect the Motor Connector Pins
The most common cause of intermittent motor operation is compressed connector pins.
Over time, the pins on the electronics box can become compressed, resulting in poor contact between the male and female ends on the motor cable and the electronics box. This happens when too much dielectric grease is applied over the pins where the motor connects to the electronics box, and excessive amounts of grease on the battery plug.
Typical symptoms include:
- Motor only works when the cable is twisted or held in a certain position
- Motor cuts in and out during use
- Intermittent engagement when applying throttle
Inspect the Pins - Motor Plug and Electronics box where the battery connects inside the unit.
Compare your pins to the images below (the same principal applies to the pins inside the electronics box where the battery connects).
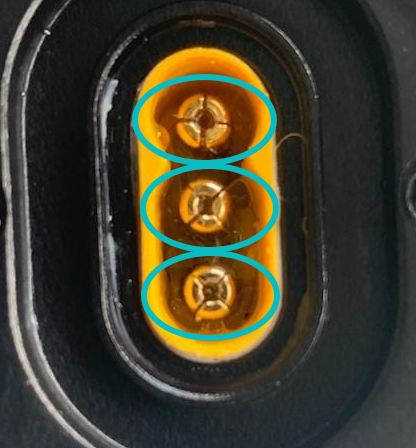 Compressed Pins
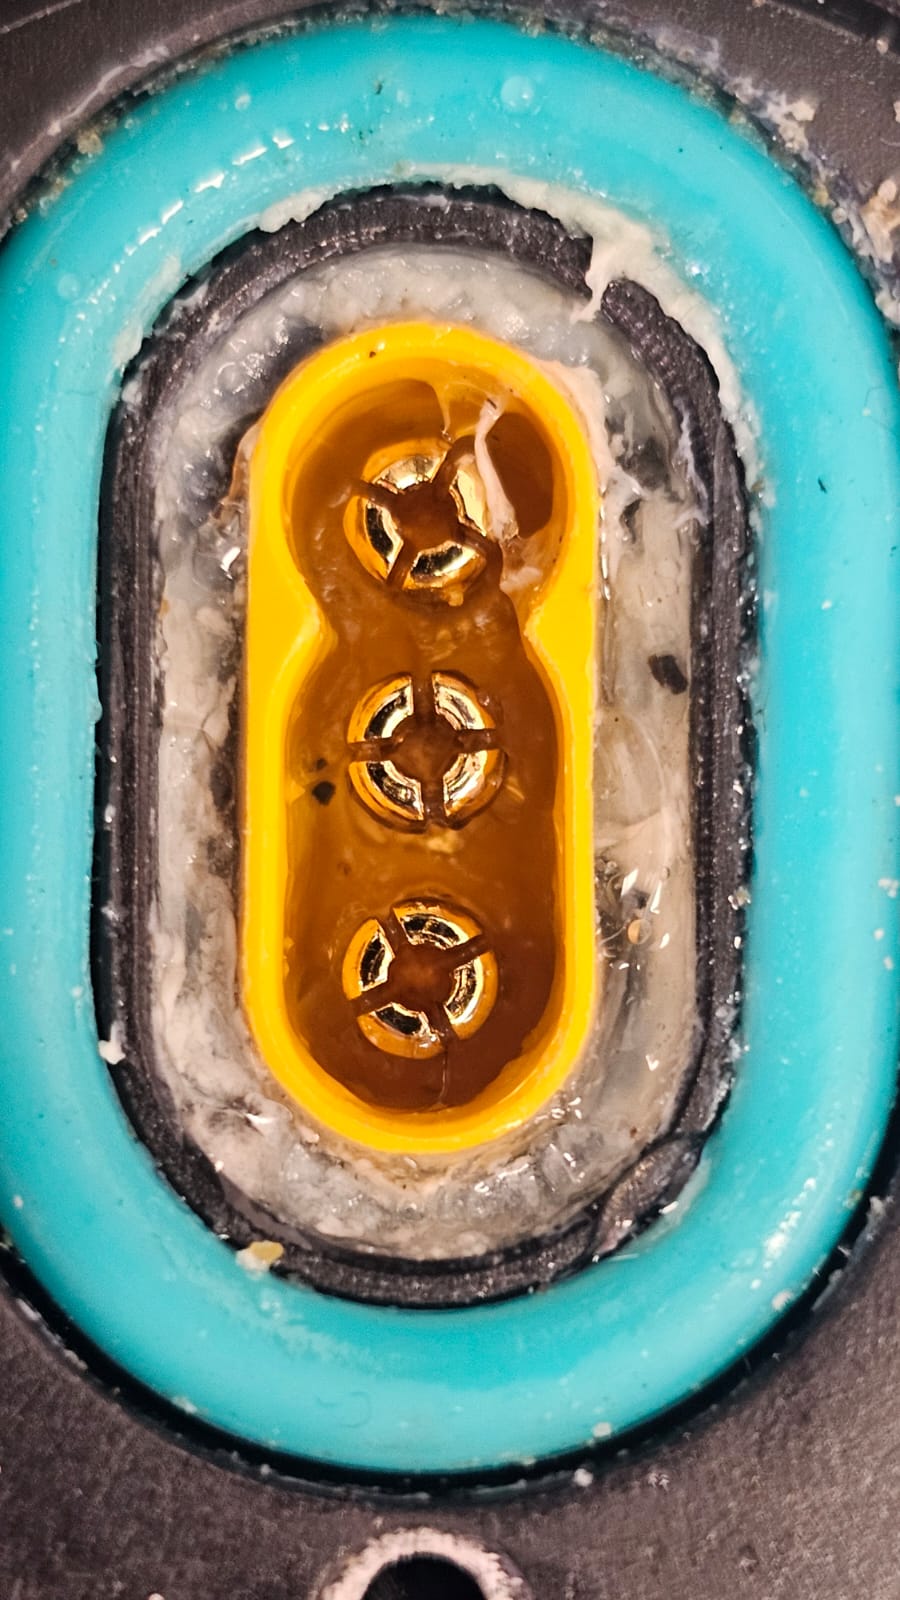 Correct Pins
If your pins resemble the compressed example, continue below.
How to Fix Compressed Pins
- Disconnect the battery.
- Inspect each connector pin carefully.
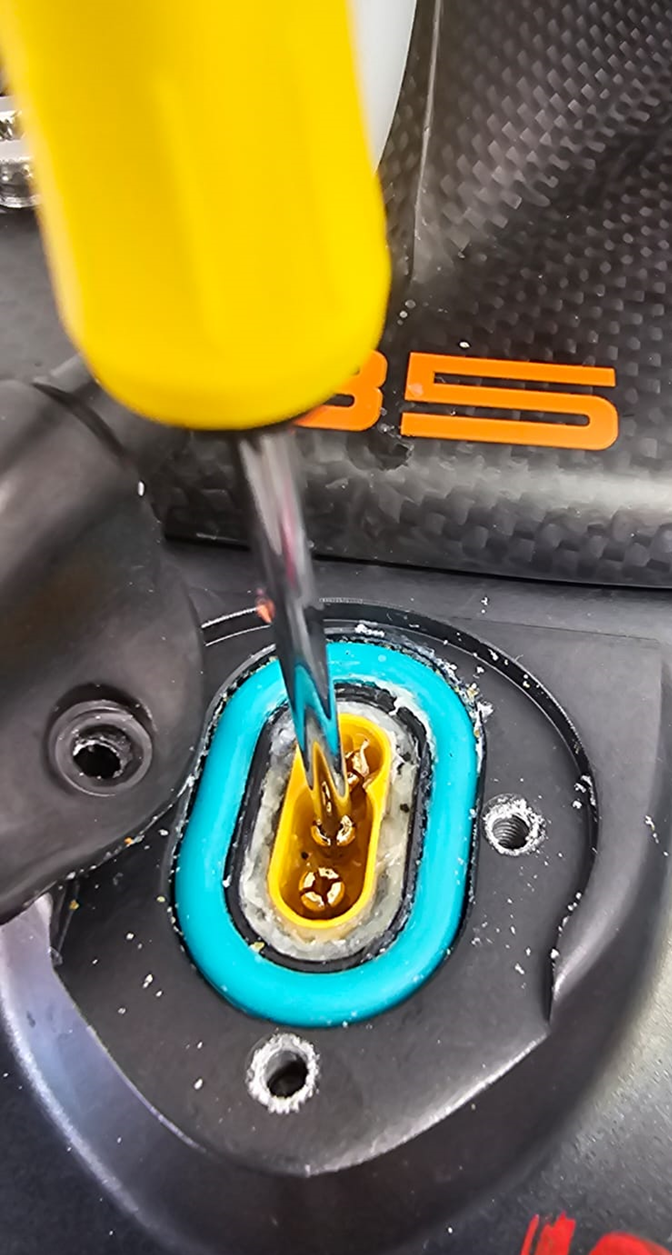
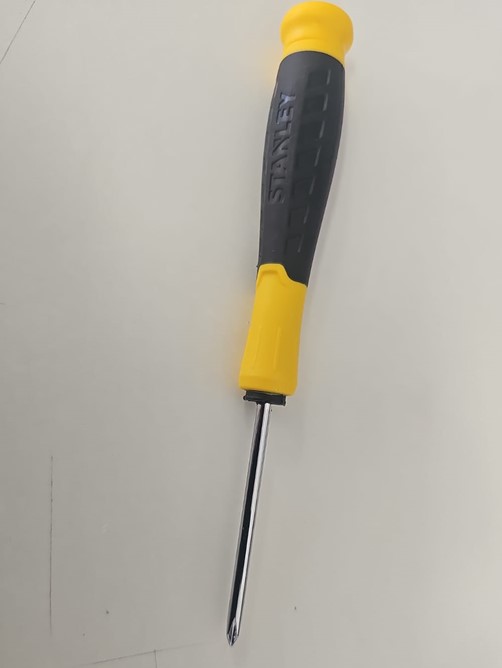
- Using a small Phillips-head screwdriver, gently insert the tip into the split of each pin.
- Apply very light pressure to expand the pin slightly.
Important: Only expand the pins a small amount. Excessive force can permanently damage the connector. If an owner fails to follow these instructions, or uses excessive force, damage as a result of this will not be covered under warranty.
Once complete, reconnect the motor, install the battery and test the system again.
How to Prevent Compressed Pins
The pins can compress if too much dielectric grease is applied over the pins. We recommend:
- Apply a small amount of grease to the O-ring at the motor plug (pictured above)
- Apply grease around the outside of the battery plug, instead of across the pins.
After the first 5-10 uses, you should have an adequate amount of built-up grease inside the electronics box. You can now apply grease sparingly, every other session or as needed, to maintain an adequate amount of grease at the plug for water protection.
Check Your Motor Bearings
Dirty, damaged, or loose bearings can cause the motor to stutter, cut out, or fail to run smoothly.
Inspect your bearings and ensure:
- Bearings are clean and free from sand, grit, debris, and salt crystals
- Bearings are not damaged or seized
- The inner bearing race is secure and does not have excessive movement
- All bearings are correctly secured to the stator
If Your Bearings Are Dirty
- Flush the stator thoroughly with fresh water.
- Ensure all sand, grit, and salt crystals are removed from around the bearings.
- Allow the motor to drain and test run the system.
If the issue was caused by debris in the bearings, this should restore normal operation.
If Your Bearings Are Damaged
If the bearings are damaged, worn, or have excessive play:
- Replace all three bearings.
Click here for detailed instructions
Check the Motor Cable for Damage
Inspect the motor cable carefully for any visible signs of damage.
Check for:
- Cuts or nicks in the cable sheath
- Kinks or sharp bends
- Damage near the motor connection
- Exposed wiring near the plug or cable ends
If the Cable Has Been Damaged
If the cable damage has occurred due to:
- A crash or stack
- Incorrect use
- Accidental damage
A replacement motor cable can be purchased through the Foil Drive website or your local Foil Drive dealer.
Click here to purchase a replacement
If you believe the cable has failed due to a manufacturing fault, please submit a warranty claim for assessment.
Click here to submit a warranty claim
Check if Your Board Has Carbon-Wrapped Foil Tracks
Some foil boards constructed with both:
- a carbon fibre board, and
- carbon-wrapped foil tracks
can reduce wireless communication performance between the electronics and controller.
This may present as:
- Motor cutting in and out
- Delayed throttle response
- Intermittent connection (Battery data disappearing from display)
- No response from the motor at all
- Motor not working when board is submerged
If your board has carbon-wrapped tracks, you will need to purchase an external patch antenna. You can purchase one directly from the Foil Drive website here - Foil Drive External Antenna | Foil Drive, or your local dealer.
Important:
- External patch antennas are not compatible with trench boards
- Carefully select the patch antenna for the system you own - Max/SLIM or Fusion.
Confirm Your Controller is Paired
If your controller has lost connection with the Foil Drive system, the motor will not respond when throttle is applied. This can occur if you've received a replacement controller, performed a factory reset, or the pairing has been lost.
Follow the pairing instructions below for your controller model.
V3 Controller Pairing
- Turn on your V3 Controller.
- Enter Pairing Mode from the controller menu.
- Follow the on-screen prompts on the controller display.
- When prompted, activate pairing on the Foil Drive unit.
- Wait for the controller to confirm that pairing has been successful.
Once paired, return to the home screen and test motor operation.
V2 Controller Pairing
- Turn on the controller and ensure the battery is unplugged from the Foil Drive system.
- Press and hold the Cruise Control Trigger (3).
- While continuing to hold the trigger, single press the Power Button (1) to enter the menu.
- Release the Cruise Control Trigger once the menu appears.
- Press and hold the Power Button (1) for 1–2 seconds to select:
- Option 1 – Pair, or
- Option 4 – Pairing (on newer V2 controllers).
- The controller will display "Pairing...".
- Plug the battery into the Foil Drive unit.
- After approximately 1.5 seconds, the controller will return to the menu, indicating the pairing process has completed.
Exit the menu and test the motor to confirm the controller has successfully paired.
Important: If the controller does not pair successfully, repeat the process ensuring the battery remains unplugged until the controller is displaying "Pairing..." before connecting the battery.
Still Having Issues?
If you've completed all of the troubleshooting steps above and your motor is still cutting out, stuttering, or not engaging, the next step is to submit a warranty claim for assessment.
Please complete the warranty form for your region and ensure you include:
- Your Foil Drive serial number
- A detailed description of the issue
- Clear photos of the motor connector pins
- A video demonstrating the fault
- Proof of purchase
Providing complete information when submitting your claim helps our Support team diagnose the issue faster and reduces delays in processing your warranty.
Warranty Claim Forms
- Global: https://foildrive.com/pages/warranty
- Europe: https://eu.foildrive.com/pages/warranty
- Americas: https://us.foildrive.com/pages/warranty
Before Submitting a Warranty Claim Checklist
Before submitting a warranty claim, please confirm you have completed the following troubleshooting steps:
☐ Checked and adjusted the motor connector pins if required
☐ Checked the motor bearings are clean, secure, and free from damage
☐ Flushed the motor with fresh water to remove any sand, grit, or salt buildup
☐ Checked the motor cable for cuts, kinks, exposed wiring, or connector damage
☐ Confirmed your controller is correctly paired to your Foil Drive system
☐ Confirmed your board does not have carbon fibre construction with carbon-wrapped foil tracks, which may affect connectivity
☐ Tested the system after completing each troubleshooting step
When submitting your warranty claim, please include:
☐ Foil Drive serial number
☐ Proof of purchase
☐ Photos of the affected components
☐ A clear video showing the fault occurring
☐ A detailed description of the issue and the troubleshooting steps already completed
Providing this information upfront allows our Support team to assess your claim faster and determine the best resolution.